Calendar
The calendar is integral
to the Calendar version of our Thermostat.
This page will show you your bookings, when the
heating will change function and at what time.
Colour code:
Red: Past
Days
Yellow: Today
Green: Future booking
White: Empty day
If you need to cancel a future booking then just
click on the event.
Click "Calendar Setup" to get started.
Calendar Setup
Three options are shown in Calendar Set Up in order to import across your events and appointments.
These can be imported across via URL or download of a file. If you do not want to set up the Calendar then choose Disabled.
Enter the relevant URL or file location and click Reload Data.
Once the data has been imported, the Default settings can be set up accordingly.
This screen will allow you to configure your calendar. There are a number of controls to help you set this up to your requirements.
The first thing to do is to import your calendar. This must be in iCalendar format (.ical; .ics; .ifb .icalendar), and can be uploaded from your computer, or automatically imported via a url.
Where can I find my calendar?
Google Calendar
Yahoo Calendar
Microsoft Outlook
AirBNB
Super Control
Beds 24
Book a Let
Eviivo
Guesty
Tokeet
Churchsuite
Zeevou
Team Up
Inn style
Smoobu
Free to Book
Lodgify
Hostaway
Hostfully
Other:
This should work with almost every calendar that supports the iCalendar (nearly everyone), and allows this to be exported. You may need to contact your provider for more information.
The calendar data is reloaded every hour. If you have a late booking and need to update the calendar, then click Reload.
Default Settings
This will allow you to configure how your thermostat will respond to these calendar events.
Check In
This is start time of your booking.
Check Out
This is end time of your booking.
Function
This is the function that the thermostat will change to.
Time
If the calendar doesn't include a start or end time, then you will need to specify one.
Override
If you want to ignore the time within the calendar and use the time specified in the setup page, then check this box.
Offset
This is the time before the check in, or check out, that you would like the thermostat to activate.
Negative
This will give you a negative offset. With this ticked, the offset will be the time AFTER the check in, or check out.
Your calendar has an event at 10:00 on Monday until 17:00 on Friday. 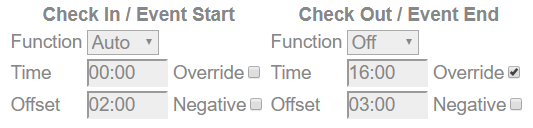
For Check In, the time is used from the calendar. The offset will be applied to this meaning that at 8:00 on Monday the thermostat will switch to Auto.
For Check Out, the override is flagged, so the time used will be 16:00 rather than 17:00. The offset will still be applied to this, meaning that at 13:00 the thermostat will switch to off.
Event Settings (Not applicable to LITE units)
Whereas the default settings will cover the majority of situations, there are times when you need different temperatures for events. E.g. a hall booked for a Spin class would require a different temperature to one booked for Bingo!
You can add any (or all) of the following into the event description within the calendar you are using.
- InspireFunction='Man'
- InspireTemperature='22.5'
- InspireProfile='2'
- InspireEndFunction='Auto'
- InspireEndTemperature='15'
- InspireEndProfile='3'
This would override the default check in (or out) function, and allow the temperature to be changed.
When the event starts, the above settings would switch the function to 'Man', activate Profile 2 and put the set point to 22.5 degrees.
At the end of the event, the Thermostat would be set to 'Auto', profile 3 activated and the temperature lowered to 15 degrees.
The available functions are:
- Off
- Auto
- Man
- Boost